Lorem ispum


Mad About Molds

Watch our Movie Clip which shows you how Step-by-Step. (20 seconds)
SO ARE YOU READY? HERE WE GO!

Start by conditioning and rolling a ball of clay to fit your mold. Warm
up the clay by rolling it around in your hands and kneading it until it is
pliable and soft.

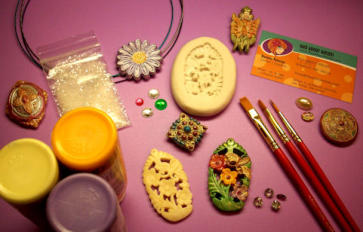
Here’s the casting that we
are demonstrating. Make
one yourself by following
our simple instructions.

After conditioning your clay, dust the inside of the mold with
corn starch or baby powder using a fluffy artist brush or make-
up brush. Dip brush in powder, then tap off the excess. Lightly
dust mold cavity in a pouncing motion. Blow out excess powder
if needed to maintain detail.

Mold Release Powder is our favorite
mold release. It’s safe and completely
non-toxic. You can purchase it here.

Now place a ball of well
conditioned clay in the
center of the mold.

If you are using a shallow
mold you can place a sheet
of clay over the mold instead.

Next place a transparent sheet of plastic on the top of the ball of
clay. A clear page from a book report cover or one layer of a
page-protector works well. Or any other type of clear plastic
sheet that you have on hand that is sturdy, but not too sturdy
that it won't peal off the back of the clay later. Read on to see
why.

Clear Release Sheets are perfect for lifting your
mold casting from your molds. Once you
discover how to use these, you will wonder what
you ever did with out them. You can purchase
this item here.


Acrylic Square Tiles are helpful
for making mold castings with
perfectly flat backs, as shown in
the instruction video, and
mentioned in the step-by-step
instructions. Once you use it,
you will never mold without it.
You can purchase this item here.
Now place a clear glass or Plexiglas tile on top of the
clear release sheet.

Press the clear tile and release sheet down slowly filling in
the mold, allowing the excess clay to flow-over the edges.
You will be able to see what's going on underneath since
your tile is clear. Be sure to press down until you are happy
with the thickness of the back. Also, if you are concerned
about making the back perfectly level, glue four small Lego
pieces to each corner of the tile. This controls how far
down the tile will go, and keeps it level. You can add or
remove the Lego pieces to control the height of the tile and
the thickness of your casting.


Now remove the tile and set it aside. Lift a corner of the transparent paper carefully, so it pulls the
clay out with it. Remember that any over flow of clay can be cut off or sanded off after baking.
To remove your clay casting from the clear release sheet without distorting it, pop it in the freezer for
about 15 to 20 minutes. When you take it out it will be easy to peal the transparent paper off your
casting without distorting the clay. First I like to cut off the edges with a craft knife before removing the
release sheet so it does not slide around on your work surface when you cut it off. By keeping it on the
sheet you can turn and stabilize the casting while cutting off the excess clay. If you need to freeze it
again to peel off the sheet from the back it is well worth the extra effort and easy to do. I also like to
smooth out the clay edges with my finger or with a clay tool to reduce the need for sanding after the
piece is baked.


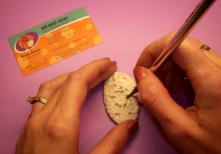
Before baking you might want to use a sharp
craft knife to remove any openings in your
casting. This is also the time to add any
cavities for stones or embellishments so that
you have a nice indentation to attach them into
after baking.
Remember to add the stones or accents after
baking or they may melt from the heat. I like to
make the cavities with a nail head since you can
get many sizes of nail heads for little or nothing.

If your object is going to be a charm or ornament,
insert a wire loop or eye screw before baking. Pin
backs, earring backs, and button backs can also
be used.
Use your
imagination and
have fun!
Click Next to go to our Advanced Instructions where you can
learn about different ways to use our molds and much more!
10 Steps for Using our Molds with Clay.
Our great technique will help you to make a perfectly flat backed mold
casting, without distorting it when removed from the mold.
Click here for instructions for using our Flexible Molds.
What are Clay Push Molds?
The term Clay Push Molds, refers to pressing softened clay or other casted material into a mold.
Dozens of highly detailed impressions can be made in minutes. Our simple process allows even novice
crafters to create pieces that look like they took hours to make. We hope this helps you make the most
of your molds and see how fun molding can be!


Basic Instructions


Lorem ispum


- Home
- About us
- Art clay projects pmc
- Basic instructions
- Cameos and molds
- Contact us
- Castings materials and instructions
- Casting recipes
- Chat
- Custom molds
- Creative ways to use molds
- Flexible mold instructions
- Gallery to inspire
- Payment and shipping
- Safety precautions
- Search and site map
- Testimonials
- Troubleshooting
- Video
Mad About Molds
Watch our Movie Clip which shows you how Step-
by-Step. (20 seconds)
SO ARE YOU READY? HERE WE GO!
Start by conditioning and rolling a ball of clay to fit your mold.
Warm up the clay by rolling it around in your hands and
kneading it until it is pliable and soft.
Here’s the casting that we
are demonstrating. Make
one yourself by following
our simple instructions.
After conditioning your
clay, dust the inside of
the mold with corn starch
or baby powder using a
fluffy artist brush or
make-up brush. Dip
brush in powder, then tap
off the excess. Lightly
dust mold cavity in a
pouncing motion. Blow
out excess powder if
needed to maintain
detail.
Now place a ball of well
conditioned clay in the
center of the mold.
If you are using a
shallow mold you can
place a sheet of clay
over the mold instead.
Next place a transparent
sheet of plastic on the top
of the ball of clay. A clear
page from a book report
cover or one layer of a
page-protector works well.
Or any other type of clear
plastic sheet that you have
on hand that is sturdy, but
not too sturdy that it won't
peal off the back of the clay
later. Read on to see why.
Now place a clear glass or
Plexiglas tile on top of the
clear release sheet.
Press the clear tile and release
sheet down slowly filling in the
mold, allowing the excess clay to
flow-over the edges. You will be
able to see what's going on
underneath since your tile is
clear. Be sure to press down until
you are happy with the thickness
of the back. Also, if you are
concerned about making the back perfectly level, glue four
small Lego pieces to each corner of the tile. This controls
how far down the tile will go, and keeps it level. You can add
or remove the Lego pieces to control the height of the tile and
the thickness of your casting.
Now remove the tile and set it aside. Lift a corner of the
transparent paper carefully, so it pulls the clay out with it.
Remember that any over flow of clay can be cut off or sanded off
after baking.
To remove your clay casting from the clear release sheet
without distorting it, pop it in the freezer for about 15 to 20
minutes. When you take it out it will be easy to peal the
transparent paper off your casting without distorting the clay.
First I like to cut off the edges with a craft knife before removing
the release sheet so it does not slide around on your work
surface when you cut it off. By keeping it on the sheet you can
turn and stabilize the casting while cutting off the excess clay. If
you need to freeze it again to peel off the sheet from the back it
is well worth the extra effort and easy to do. I also like to smooth
out the clay edges with my finger or with a clay tool to reduce
the need for sanding after the piece is baked.

Before baking you might want to use a sharp craft knife to
remove any openings in your casting. This is also the time to
add any cavities for stones or embellishments so that you have
a nice indentation to attach them into after baking.
Remember to add the stones or accents after baking or they may
melt from the heat. I like to make the cavities with a nail head
since you can get many sizes of nail heads for little or nothing.
If your object is going to be a charm or ornament, insert a wire
loop or eye screw before baking. Pin backs, earring backs, and
button backs can also be used.
Use your
imagination and
have fun!
Click Next to go to our Advanced Instructions where you can
learn about different ways to use our molds and much more!
10 Steps for Using our Molds with Clay.


Basic Instructions
Our great technique will help you to make a perfectly
flat backed mold casting, without distorting it when
removed from the mold.
Click here for instructions for using our Flexible Molds.
What are Clay Push Molds?
The term Clay Push Molds, refers to pressing softened clay
or other casted material into a mold. Dozens of highly
detailed impressions can be made in minutes. Our simple
process allows even novice crafters to create pieces that look
like they took hours to make. We hope this helps you make
the most of your molds and see how fun molding can be!